
If you're thinking of starting out gardening, I'm a beginner and some of this info might be beneficial to you! There's a ton of information I've added from sources I've compiled over the past couple weeks.
_________________

Some of my earliest memories as a child involved my mother's plants. Equipped with a set of green thumbs, my mom grew massive plants both indoors and outdoors, and as I grew older I was often enlisted to help her water them, and gently, of course, or else!
Gardening has numerous benefits for the mind, body, and soul.
- It encourages a healthy and responsible lifestyle by having your own fruits and veggies to eat for very little money.
- It's relaxing and therapeutic being surrounded by green things, and it puts your mind at ease having your own piece of nature to go back to after a busy day.
- It is a constant reminder of the blessings of your Creator, seeing the miracle of a tiny seed growing into something lush and green which benefits you in so many ways.
Lessons Learned


2014 Garden: Scotch Bonnet Pepper plants and Cherry Tomato Plants on a balcony
So now having a home of my own, I embarked on the gardening journey in 2014.
My eventual goal was to grow as much produce as I could to cut down on grocery costs, while not spending too much on supplies. I was living in a building, but luckily I had a glass-paned balcony that was close to south-facing. Over the course of the season I grew two huge cherry tomato plants, scotch bonnet peppers, cucumbers (I attached a trellis to two posts on the balcony), lettuce greens, and herbs. The plants I grew from seed were just as good as the ones bought from the garden centre, which was delightful.
I learned a lot that year in regards to container size, watering, and light, but it was an excellent year and I was quite happy with what I grew. The only downside was the money I spent on containers and the fully grown tomato plants since I was starting from scratch, but it was more of an investment for future experience and reuse.
 |
| 2015 Garden: Scotch Bonnet, Tomato, Eggplant, Cucumber, Green Beans, Herbs |
I also had tomatoes, scotch bonnets, long eggplant, cucumbers, and herbs but other than the herbs, nothing else did that well, and now I think I understand why. I didn't know that you had to refresh potting soil with new fertilizers and nutrients, and other than using liquid fertilizer once or twice, I didn't really feed the soil at all.
2016 Goals
In 2014 I believe I had good results because I used new bags of potting soil which contained fertilizers, so I didn't have to add much else. So 2015 wasn't a great year, but from poor results I learned much, and am now determined to make the following goals happen:
- Most of my containers were too small. Find free 15 or 19 Litre heavy duty buckets from restaurants and bakeries to use for tomato and pepper plants. Spend $0 on additional containers for the garden.
- Refresh old potting soil. Find low cost or free ingredients such as: compost (the City of Toronto apparently has free compost days), other organic matter like peat moss, and other fertilizer (eggshells? 10-10-10 fertilizer? Advice is welcome!) to mix into the old soil.
- Grow most or all of plants from seed this year to cut costs and improve variety, and grow organic heirloom seeds so that I can collect the seeds for the following year. (Complete! I attended an event by Seeds.ca called "Seedy Saturday" , where organic seed vendors sell a huge variety of seeds.)
What I've done so far this year: Step 1 - Materials
While keeping in mind that I would like gardening to be part of my lifestyle in future, I made a few investments in some materials that would help me with germinating my own seeds for years to come inshaAllah.
- Seedling Heating Mat

When plugged in, the soil of seedling containers placed on top will be raised by 5-10 degrees, which is vital in my sometimes-very-cold home. Since I want to germinate hot pepper seeds, I read that the soil temperature should be consistently between 20 to 30 degrees Celsius, so I figured that I definitely needed this. The last time I tried germinating seeds I had a slew of them that never did germinate, so I'm thinking this will improve my chances. It's doing pretty great so far! - Seed Tray and Dome cover

This purchase was more for cleanliness and efficiency than anything else. I knew I would have a ton of little cups with seedlings, and I don't have any sort of flat, long container at home that I could use to put them in, so this purchase made sense. It was also really cheap. The dome is great for creating a greenhouse-like atmosphere with humidity, but also has little vents on top that you can open and close.
I bought the "Sun blaster" brand cover and tray from Home Hardware, and what's interesting is that there are grooves on the top for adding lights for your plants. The lights are, of course, really expensive, but I figure maybe in a few years I'll find 'em cheap on ebay or something. - Heirloom Seeds

At Seedy Saturday a number of the seeds I bought were heirloom, and what's great about that is that when I save the seeds from these plants from the end of the year and use them again the following year, they will grow to be the exact same plant. I'm still learning about this stuff, but the prospect of growing the exact same plant year after year is attractive to me, especially if the results are proven to be great.


Step 2: Research & Organization - Spreadsheet fun!
Since I now had a huge collection of seeds, I had one problem: I don't have the experience or knowledge to know what to start when. Should I start cucumber seeds now? When should I transfer the plants outside? How deep should I plant pepper seeds? Too many questions!

I started with finding out the last frost date in my area, since so much depends on that date.
Then I made a massive spreadsheet (something I quite enjoy) to collect information on each seed so I had something to refer to, and also as a record for following years. Most info was gleaned from the back of each package, but for the packages with no information, I googled to find the crucial bits of info for each, such as: when to transplant outdoors, when to start, germinating time and temperature, and other important bits. It's been mighty helpful so far!
Step 3: Choosing a starter soil
So first I had to choose and buy soil for the seeds. I learned that you could buy a bag of prepackaged "seed starter soil" with nutrients that seedlings need, but there were other options. The best would be to mix your starter soil yourself, but that requires you to have a number of different ingredients on hand, like peat moss, vermiculite, and other stuff. Since I wasn't doing a huge number of seedlings I decided on just buying a bag of the pre-mixed soil since that'd be most cost-efficient in my case.
Next problem was my local stores didn't have seed starting mix, so I had to go to plan B. I read a review of several different starting mixes available in stores. None of the recommended products were available other than Miracle Gro potting mix, so Miracle Gro it is. It also had the added bonus of containing some fertilizer in the mix itself, so I'm hoping my seedlings will be strong and healthy inshaAllah. The only immediate problem I saw with the soil was that it contained a lot of big pieces of sticks, so I had to take those out myself.

Next, I decided that I wanted to sterilize the soil. The last time I started seeds indoors, within a few weeks I had tiny little flies (apparently called "fungus gnats") all over my house, and that was an experience I didn't want to repeat. A lot of gardeners online recommended sterilizing the soil (thereby killing the gnat eggs within) by either mixing boiling water into the soil, or microwaving it for 2 minutes, or both (freezing doesn't work, apparently). Paranoid as I am, I did both. The steaming soil scent was a strange experience but I hate those gnats, so I hope they're really dead.
The only disadvantage of doing this was that you're also killing any beneficial microbes within the soil that would benefit the plant, but that's mostly needed for your normal gardening. Most said that seedlings don't require these microbes to start out, especially if you're going to give them liquid fertilizer later on.

Next I added enough water to the soil that it's very moist to the touch (and let it come back to room-temperature since I sterilized it), and labeled my containers with the name of each plant and the date I'm planting it. I washed out and reused some styrofoam cups that I used in 2014, which have holes punched in the bottom for drainage.
Step 4: Planting the seeds

My spreadsheet research let me know that I had 3 plants that I should start now.
I started with the peppers. I thought long and hard about planting these Trinidad Scorpion Pepper seeds. The package was the most expensive compared to other seed prices, and it only contained 15 seeds. I wanted two plants for myself, and from what's left I could give to family and friends. I also didn't want to use them all in case I did poorly and none germinated, so I could try again later. There's also the possibility of trying too many seeds and having ALL of them sprout, which some would then go to waste.
I finally decided to use 6 seeds, and only one in each cup. It's a gamble, but Baker Creek Heirloom Seeds have a good reputation, and many reviews said that most if not all of their seeds germinated for this plant specifically. I'm hoping at least 2 out of 6 will do well.

This is a package of three types of mini bell pepper plants, each bearing peppers that are either yellow, red, or black. All the seeds look exactly the same so I randomly picked 3 seeds to plant into one cup. I read that you should trim the weakest one out of the three and let the other two live together without separating them during transplant. I just hope I don't end up with two plants bearing the same colour!

My mom requested me to start some green onions for her containers, so I bought this cool package of red and green ones. In this video I learned that you could just spread the seeds thickly and as long as they've got light and nutrition, they're pretty much indestructible even in the smallest of containers. So I spread the seeds thickly in two larger sized containers, one for me and one for my mom.

So after filling the cups with soil and planting the seeds at the recommended depth, I set them all on the plastic tray which sat upon the heated mat, and covered with the dome. The soil was wet enough that I wouldn't need to water them for a long while.
Step 5: Temperature Maintenance and Light

To test the results of the heat mat, I used a meat thermometer (which sits ever-unused in a drawer) to test the soil temperature of the seeds, and when the house temperature was about 20 C, the temperature of the soil was fluctuating between 25 and 27 degrees. This is a good thing for the pepper plants especially, which needs high temperatures to germinate. Seed heating mat success!

This is the "humidity dome" which is used to create a greenhouse atmosphere to help seeds germinate. The moisture of the soil evaporates and creates condensation, which is normal. I opened the vents on the top a bit for some air flow, which I'm not sure is proper but just seems like a little new air is a good thing.
Note: After most seeds germinate, you are supposed to get them out of the humidity dome or else they'll get "damp off".
Lighting
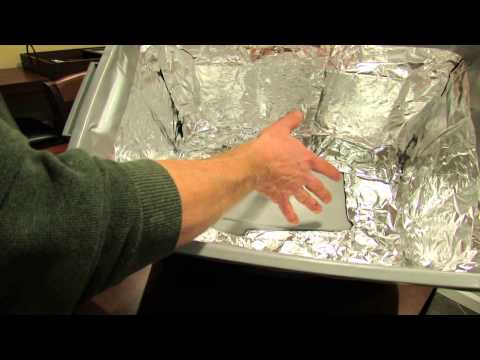
Why did I tape some foil to the back side of the dome? Because I'm starting to think about experimenting with lighting. Apparently seeds don't really need much light to germinate, but once they do, they will need a lot of light or else they'll stretch as they grow and become frail.
All the pro gardeners I looked at online have these set ups with professional lights in racks which adjust in height for the different stages of seedlings, but I'm definitely not going to go that far.
 |
| Credit: The Rusted Garden |
The most inexpensive and effective option I found was a "grow light box" which involved attaching a light bulb to the cover of a huge container, and covering the insides with foil for reflectiveness while placing your plants on the bottom.
It's a good idea but I still didn't want to spend extra money on the special light fixture and container if I don't really need to. So I started to play around with what I have on hand: a height-adjustable desk lamp, some foil, and a 100 watt CFL light bulb.

I wanted to see if foil would really be useful or not, and after testing it with the lamp, I would say yes. The reflectiveness definitely increased the brightness bouncing back onto the cups.
So while I won't be having the dome covering the seedlings when they do germinate, I'm thinking that once they need light, I'll try to figure out some sort of setup using the dome on its side covered in foil, or perhaps making something out of cardboard covered in foil so that the lamp I have has its light used a little more efficiently.
Will the one light bulb be enough? All the research I've seen online says no, but I'll have to wait and see. The good thing about this desk lamp I have is that it can bend really low, and I read that new seedlings should have a light just a few inches above.
So that's it for my first gardening post, but if you're a gardener and you have any tips or advice, I would love to hear it! Similarly, if you're a beginner, I'd love to hear about what you're planning to do this year!
-Maryam
__________
The Gardening Project Series:
__________
The Gardening Project Series:
No comments:
Post a Comment